How to Send SMTP Emails from WordPress Without a Plugin
Are you looking to set up SMTP email sending in WordPress without relying on plugins? You’ll be happy to know that it’s quite straightforward when using Google Workspace (formerly G Suite). In this guide, you’ll learn how to configure SMTP email sending using just two files in your WordPress installation.
Configuring Google Workspace SMTP Relay to pass WordPress emails
Before the WordPress configuration can work, you’ll need to set up SMTP relay service in your Google Workspace admin console. Here’s how to do it:
- Sign in to your Google Workspace admin console.
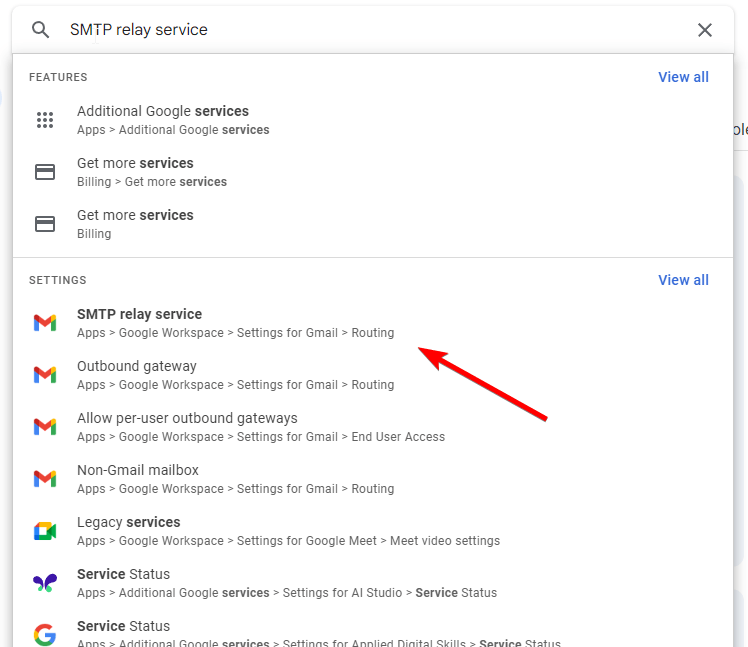
- Use the search bar at the top and type “SMTP relay service.”
- Once in the routing page containing the SMTP relay service:
- Click “Add another rule.”
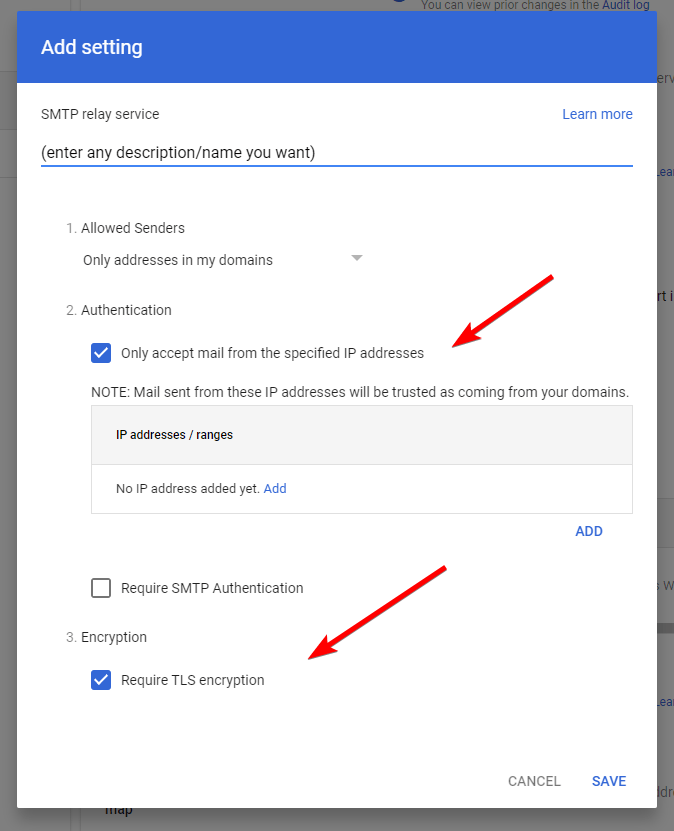
- Enter a meaningful description for your rule.
- Under “Allowed senders,” choose who can use this SMTP relay.
- Select “Only accept mail from specified IP addresses.”
- Enter your server’s IP address (you can get this from your hosting provider).
- In the encryption section, select “Require TLS encryption.”
This configuration ensures that only your WordPress server can send emails through your Google Workspace account, now, let’s proceed to set up the WordPress side.
Setting Up The SMTP Configuration In The WordPress Side
First, you’ll need to add some configuration code to your wp-config.php file. This code establishes the basic SMTP settings that WordPress will use to connect to Google’s SMTP relay service, And yes, it’s only five lines of code. You can place it anywhere in the file, but it’s better if you wrap it, Like this:
<?php
// Start - define SMTP parameters
define('SMTP_HOST', 'smtp-relay.gmail.com');
define('SMTP_PORT', '587');
define('SMTP_FROM', '[email protected]');
define('SMTP_SECURE', 'tls');
define('SMTP_AUTH', false);
// end
When adding these lines, do not delete or remove any other sections in that file. You’re only adding these lines. These lines define your SMTP connection parameters, including the host server, port number, sender email address, and security settings. Make sure to replace ‘[email protected]’ with your actual Google Workspace email address.
Tell WordPress to use your SMTP to send emails
To tell WordPress to use SMTP to send your emails, there is another section of code you need to add to functions.php
<?php
//  Start - Sending emails using SMTP instead of a plugin
add_action('phpmailer_init', 'workspace_smtp_config');
function workspace_smtp_config($phpmailer) {
    $phpmailer->isSMTP();
    $phpmailer->Host = SMTP_HOST;
    $phpmailer->SMTPAuth = SMTP_AUTH;
    $phpmailer->Port = SMTP_PORT;
    $phpmailer->From = SMTP_FROM;
    $phpmailer->SMTPSecure = SMTP_SECURE;
}
// end
Time to test that everything works
To ensure everything is working correctly, you’ll want to add a testing mechanism. Add the following code to your theme’s functions.php file:
<?php
//  Start - Test email sending (Remove after you're done with testing)
add_action('wp_footer', 'add_test_email_link');
function add_test_email_link() {
    // Only show if you're an admin
    if (current_user_can('manage_options')) {
        echo '<div style="position:fixed; bottom:20px; right:20px;">';
        echo '<a href="' . add_query_arg('send_test_email', '1') . '"
              style="background:#007cba; color:white; padding:10px; text-decoration:none; border-radius:5px;">
              Send Test Email</a>';
        echo '</div>';
    }
}

add_action('init', 'handle_test_email');
function handle_test_email() {
    if (
        isset($_GET['send_test_email']) &&
        current_user_can('manage_options')
    ) {
        wp_mail('[email protected]', 'Test Email', 'This is a test email from WordPress');
        wp_redirect(remove_query_arg('send_test_email'));
        exit;
    }
}
// end
This code creates a convenient testing button that appears in the bottom-right corner of your website, but only when you’re logged in as an administrator. When you click the button, it sends a test email to the address specified in the code (make sure to replace ‘[email protected]’ with your actual email address).
How to Test
- Log into your WordPress admin panel, as an administrator.
- Visit any page on your website.
- On the bottom, you will find “Send Test Email” button.
- Click the button to send a test email.
- Check your inbox for the test message.
Important: Cleaning Up After Testing
Once you’ve confirmed that your SMTP configuration is working correctly, you should remove the testing code from your functions.php file. This means deleting both the add_test_email_link and handle_test_email functions. This step is important for security and keeping your code clean.
You can keep the SMTP configuration in wp-config.php as it’s needed for ongoing email functionality.
Now your WordPress site is configured to send emails through Google’s SMTP relay service without the need for any plugins!

